


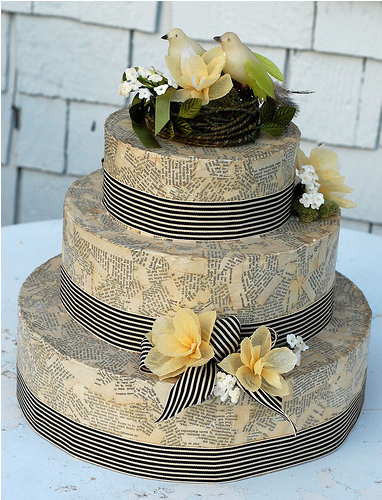
Every Thursday Once Wed features a DIY wedding project created by the very talented Laurie Cinotto of lalalaurie. Last week Laurie created the cake box below for guests to drop their wish cards into for the bride and groom in replacement of the typical “wish bowl”.
Below Laurie was kind enough to give us two options on how to decorate the box and in the upcoming weeks she will provide us with pictures and instructions on how to create the paper flowers and cake topper. To see previous DIY projects by Laurie, click here. Thursday we will premiere a brand new DIY project on EAD, so don’t forget to stop by and check it out…
Supplies:
Three round boxes (a small, medium and large)
One roll of paper gift wrap
Mod Podge Glue
Four yards of ribbon
An assortment of trims (artificial flowers, velvet leaves, etc)
Tools:
Small foam paint brush
Pencil
Ruler
Exacto Knife
Scissors
Glue Gun
Resources: Most craft stores carry all the supplies you need for this
project.
Directions:
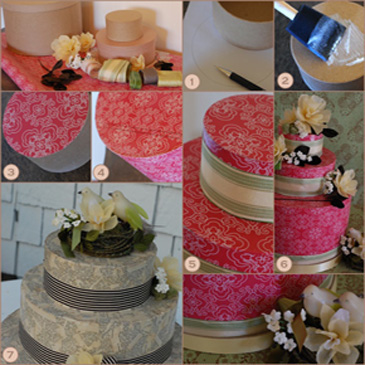
Lay a sheet of your wrapping paper print side down. Place your boxes on
the paper (bottom side down) and trace around each box using a pencil.
(see figure one) Carefully cut out each circle.
Measure the height of each box, and cut a strip of paper as wide as the
height of your box and long enough to wrap completely around the
circumference.
Turn all three boxes over, so the bottom of box becomes the top of your
“cake tier”. You won’t be needing the lids to the two smaller boxes, just
the lid for the largest box which will be the bottom tier of your paper
cake.
Before you begin gluing, be sure to protect your work surface. Mod Podge
can be messy.
Apply an even layer of Mod Podge to the top of one your cake tiers using
a small sponge brush. (see figure two) Carefully place your paper
circle on the top of the box (in the glue) (see figure three). Smooth out
any air bubbles. Don’t worry about small wrinkles. They should
flatten out as the glue dries.
Glue the paper circles on the tops of the two remaining cake tiers.
Use the same gluing technique to adhere the paper to the sides of each
cake tier. As you wrap the paper around, it’s more important that the
paper lines up with the top of the tier rather than the bottom. The
bottom edge will be concealed with ribbon later.
When all three tiers are covered in paper, brush a thin layer of Mod Podge
on each tier’s papered surface. This will give the cake a subtle luster
and smooth down any edges you may have missed. If you would like a
richer surface, apply several coats of Mod Podge. Be sure allow at least
fifteen minutes for the Mod Podge to dry between coats.
On the top of the largest tier, as close as you can get to the edge, use
a Sharpie Marker to draw a “slot” large enough for a card to drop
through. (see figure four) CAREFULLY cut out the slot using an exacto
knife. It can be helpful to use a small metal cork-backed ruler as a
guide when you cut.
Decide how you would like to have each cake tier positioned, then use your
hot glue gun to glue them into place. ( Be very careful not to burn
yourself when handling your glue gun.)
At the bottom of each tier, wrap and glue down a length of ribbon. (see
figure five)
Glue a ribbon along the edge of bottom cake tier’s lid. This lid becomes
the bottom of your paper cake and makes the deposited cards accessible.
Decorate your cake ! (see figure six) Select your flowers, leaves and
trims, and use your hot glue gun to glue them into place. You can
place a traditional cake topper on the top of your cake, or create your
own.
As a variation on the idea, I collaged old book pages on the surface of
this cake. (see figure seven). You could decoupage anything. The sky’s
the limit!
In weeks to come, I’ll be giving instructions on the bird nest cake topper
and paper flowers too.
Budget:
3 paper boxes – $14
1 roll of wrapping paper – $4
4 yards of ribbon $10
Small bottle of Mod Podge $3
Trims and flowers $0 (Use up those little bits of this and that you’ve
got stashed in your crafting supplies)
Total Cost – $31