


The wedding invitation from my inspiration board became the starting point for designing our wedding…the color scheme, linens, flowers, lighting, stationary, and even the cake were inspired by this invitation.
After contacting several invitation designers for custom quotes to recreate the wedding invitation from my inspiration board, I was left feeling completely discouraged because all of the quotes were completely out of our budget. It was at this point that the thought of a DIY wedding popped into my head. I knew that I would be able to recreate my inspiration invitation if I only knew the process.
After some online research I discovered that my inspiration invitation was not actually created using fuchsia paper with white text printed on it. Instead it was created using offset lithography, meaning that the invitation itself is actually white heavy cardstock and the fuchsia pink is an ink that is printed on top of the cardstock. The text that is visible is actually the white cardstock that was not covered by the fuchsia ink. I also found that offset lithography is the most common form of printing because it is fast, efficient, cheap, and relatively easy to do.
Now that I knew the process of creating my inspiration invitations, it was time to start designing our own invitations.
Here is a list of the materials I used to create our invitations:
* Heavy Weight White Cardstock
* 12 x 12” Textured Orange Colored Paper
* 12 x 12” Textured Mango Colored Paper
* 8-1/2” x 14” Heavy Weight Citron Green Cardstock
* Glue or other adhesive
* Paper Cutter
* Raspberry Wired Satin Ribbon 1-3/8″
* 6-1/2” Square Orange Colored Envelope
* 3-5/8” x 5-1/8″ Mango Colored Envelope
Instructions:
Before I started designing our invitation, I looked online at the numerous wedding resources and blogs to determine exactly what necessary information needed to be on the invitation.
Like the inspiration invitation, I also wanted to use two fonts on our invitations. I found a great online resource, My Fonts, to download two fonts that I liked. I chose P22 Cezanne and P22 FLLW Terracotta.
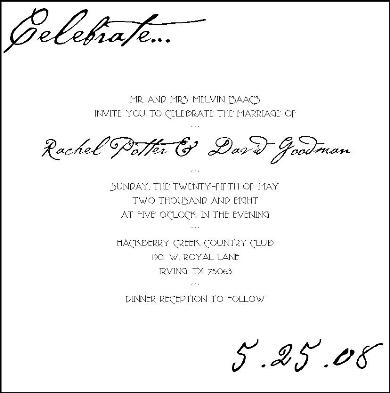
Next I made a basic black and white invitation template in Microsoft Word. I started with a 5-1/2” square table and inserted text into the table to create the invitation. Like I mentioned previously, I used our wedding date (5.25.08) as a theme throughout our wedding stationary. Below is an example of the black and white Microsoft Word template I created:
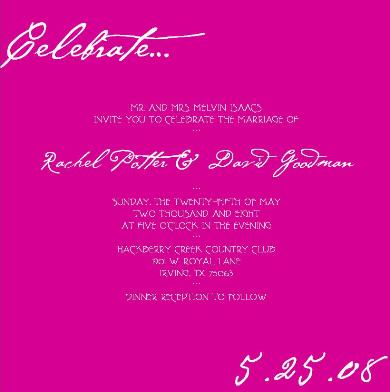
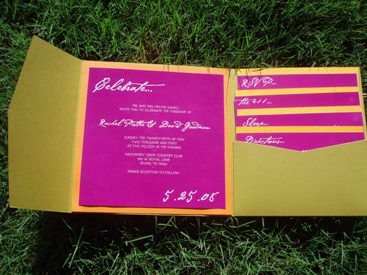
After the template was created, I simply shaded the background of the table a bright raspberry color, changed the font to white, and removed the black borders on the table. I used the bright white super heavy cardstock from Office Depot and a laser color printer to print our invitations. Here is an example of the invitation after the color has been added:
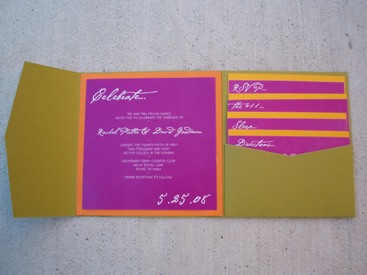
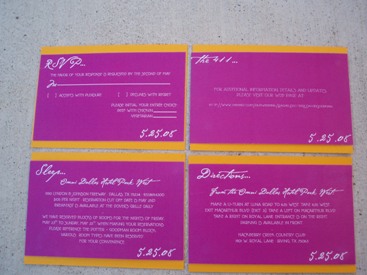
I also created four enclosure cards: Sleep (hotel information), Directions, RSVP, and the 411 (additional information). All of the enclosure cards were created and printed using the same process as the invitations. After the invitations and insert cards were printed, I used a paper cutter to cut each enclosure card and invitation.
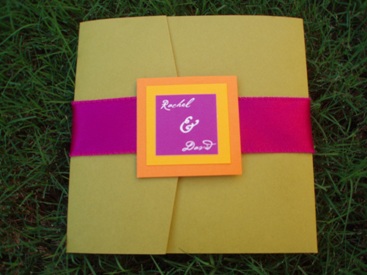
To make our invitation unique from the inspiration invitation I decided I wanted to put the invitation and other insert cards on brightly colored backing paper and inside a pocketfold. We found textured mango and orange colored paper at Hobby Lobby. The mango colored paper was used to back the enclosure cards and the orange colored paper was for the main invitation.
To create the pocketfold, I found extra large citron green heavy cardstock paper at Hobby Lobby and followed these directions that I found online for a 5.75” square pocketfold.
We also found Astrobrights envelopes at Envelopemall.com in mango and orange which matched perfectly with our color scheme.
The invite components measure as follows:
Pocketfold: 5.75” square
Invitation: 5.5″ square
Directions: 5”w x 3”h
Accommodations: 5”w x 3”h
Additional Information: 5”w x 3”h
RSVP: 5”w x 3”h
Mango colored paper: 5”w x 3.5”h
Orange colored paper: 5.75” square
The sticker components measure as follows:
Sticker: 1.5” square
Mango colored paper: 1.75” square
Orange colored paper: 2” square
Ultimately each wedding invitation consisted of an outer envelope, a pocketfold, the actual invitation, an information card, a reply card and envelope, an accommodations card, and a directions card. The invitation was finished off with a raspberry pink, wired edge ribbon that I found through Paper Mart Packaging Store and a sticker I created using the same process as described above. The total cost of each invitation was $2.30 plus postage.
I LOVE how they turned out and I think the invitations truly set the tone and vision for the wedding.