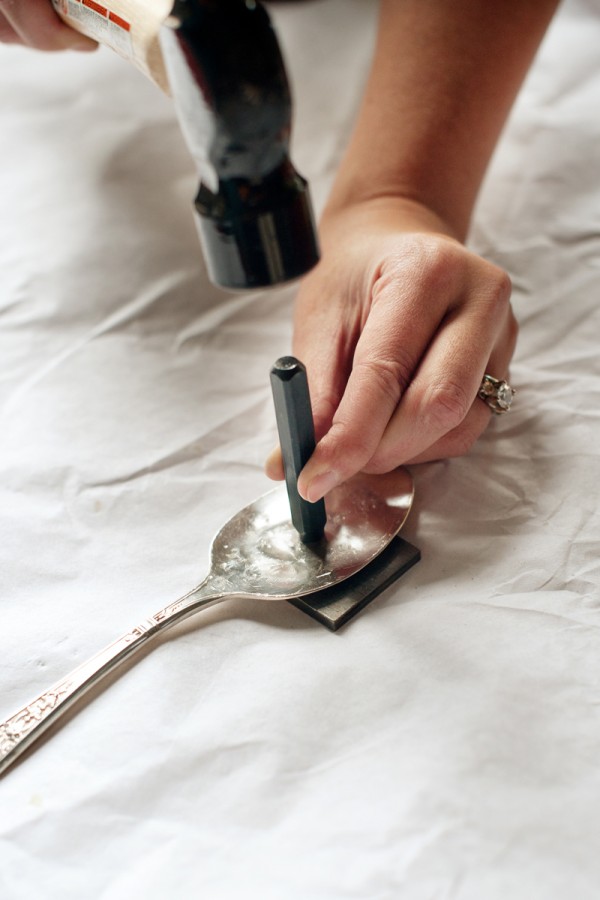
unique details
Personalized Cocktail Napkins
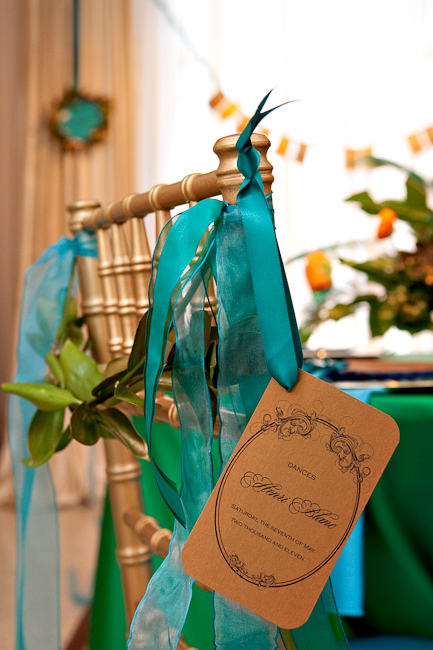
Welcome to the EAD Weddings blog! We are so excited to have you here. If you are a new visitor, we'd love for you to subscribe to our RSS feed and visit our sister site, EAD Living. Thanks for visiting and we hope you come back soon!
I’m not entirely sure when I decided I “needed” to Gocco some personalized cocktail napkins, but it was quite some time ago…months ago, in fact. And just when I had decided the cocktail napkins could be pushed to the back burner, Heather (who is my wedding day twin!) posted photos of her awesome cocktail napkins and I immediately knew personalized napkins were once again on the agenda. Heather scored her napkins on sale at Party City, but I picked mine up from The WEBstaurant Store, in the dove gray color, for about $13 with shipping and they arrived just a few days later. I spent about an hour this evening printing all 250 napkins and I have to say, this might just be among the most satisfying $13 and 60 minutes I’ve invested in the wedding to date. I am so glad I decided not to skip out on the napkins - I totally love how they turned out!
Is anyone else planning to DIY personalized napkins? Make sure to share if you do!

Song Request Cards
Scattered about our tables we had stacks of song request cards. I loved the little premise that I ended up with of having song names that are actions for the headings on our cards. Here are the headings we used:
Come on, let me Shake My Tail Feather to…
Shake it up baby, let’s Twist and Shout to…
We’ll be dancing, Shagging on the Boulevard if you play…
We’ve gotta Jump Jive An’ Wail to…
I inkjet printed on 3.5×5 Paper Source cardstock, rounded the corners, and voila! Each song from the card titles above was played during the night too. We had so many song requests that the DJ couldn’t fit them all in, so if you want your guests to participate this is the way to go.
Are you setting a playlist? Letting your guests request songs? Giving your DJ and band free reign?
E.
Previously: Choosing My Venue, Out of Town Baskets, Do Not Disturb Signs, The Welcome Party (Part 1, Part 2), Welcome Party Wrap-Up, Lighting the Lawn and Porch, Bathroom Baskets, DIY Coat Check Tags, Ceremony Music, Our Same Day Edit Video, Getting Pretty, Getting Ready Part II, Portraits, The Ceremony, Ceremony Readings, Cocktail Hour Decor, DIY Wine Glass Charms, Time Capsule Guest Book, Cocktail Hour Entertainment: Blackjack, Reserved Signs, Embroidered Napkins, and the Cocktail Hour, Estate Table Centerpieces

Reserved Signs, Embroidered Napkins, and the Cocktail Hour
Two small details from the vow renewal that you haven’t yet seen are the reserved signs for the ceremony chairs and the embroidered hemstitch cocktail napkins.
The reserved signs were a super-easy project. Here they are (backwards) on the chairs).
Supplies needed (makes 8):
* Ribbon
* Two pieces of 8.5 x 11 cardstock
* One piece of 8.5 x 11 Accent paper
* Self-adhesive velcro dots (8 pairs)
* Adhesive
Instructions:
1) Cut 8.5 x 11 piece of cardstock in eighths vertically (two rows of 2.75 x 4.25″ cards).
2) Cut accent paper into 2.25 x 3.75″ cards.
3) Cut 8.5 x 11 piece of cardstock into 2 x 3.5″ cards. If desired, pre-print “Reserved” on cards - I use MS Word tables for this purpose.
4) Mat 2 x 3.5″ cards on accent paper cards. Calligraph or write names on cards.
5) Cut ribbon to desired length and if desired, cut inverted V in ribbon ends. Length will be dependent upon the measurement of your chairs. My ribbon was approximately 24″ in length.
6) Leaving 4″ or so at end, glue the middle of the accent paper backing to the ribbon. Then glue the accent paper to the 2.75 x 4.25″ cards. The ribbon will now be secured between the accent paper layer and the backing.
7) Attach self-adhesive velcro circle to back of card. I attached only one side at the point of making them, and when we wrapped them around the chairs, we adhered to the other side of the ribbon.
Me, fixing afforementioned backwards reserved signs (sigh, I felt like I was doing things like this all night):
You may remember that our printed materials had a small flourish motif, which I carried forward into the event. One place it showed up was on the embroidered linen hemstitch cocktail napkins. I loved the way these turned out - such an unexpected little detail!
Some more photos from the cocktail hour before I move on to the reception!

DIY Wedding Projects: Napkin Rings
Kathy from Merriment Design thrills me again with these gorgeous and super-creative napkin rings made from Saran Wrap tubes, fabric, and ribbon. LOVE!

{Tutorial found at Merriment Design}

Peonies, DIY, jewelry, apparel…oh yes. This post has it all.
WEEKEND!
Phew. Sorry. I get a little excited when it comes to weekends lately. After all, I’m still in class, studying for finals, getting ready to start my internship, planning a wedding, moving, trying to keep my fiance sane as he studies for the board exams…phew! So weekends are always a welcome time for me to catch up on sleep and wedding details.
Unfortunately, it’s been drizzly and rainy here in Southern Cal. All the more reason for me to stay in bed with a nice cup of hot chocolate and peruse some blogs…alas! There is no time, mon petit choux! I realized today that I’ll be flying back to Colorado in exactly 2 weeks! That means it’s panic time here in wedding planning land. Here are a few of the things I’ve done this week:

{Photo from author’s personal collection of semi-blurry photos}
Our bride and groom chair covers are (finally!) complete. They certainly took some work and were a definite labor of love. They consist of a linen background, the flowers I showed you all how to DIY last week, feathers, some leaves cut from scrap fabric, and ribbon to tie them to the chairs with. I think I’ll be reworking the lettering on the “bride” cover to make them look a bit more uniform, but overall I”m fairly happy with them! They fit right into my homespun, kraft-y wedding. And while all these little details may be a lot of work…I just know I won’t be satisfied with myself if I don’t give my wedding it’s own personal thumbprint. Speaking of which, I’m thinking/hoping/wishing/praying that peonies will still be blooming mid-June: please look.
DROOOOOOOL! How is it that peonies can just class it up merely by plopping down in a cup and saying “here I am! Admire me!” They’re sitting here by my bed right now, putting off the most amazing scent ever. Pleasepleaseplease keep blooming, lil’ peonies! 3 more weeks! (More eye candy below!)

Reception Details II
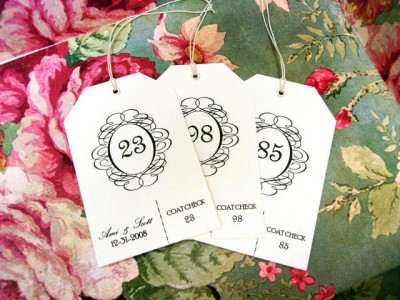
{All images from Author’s personal collection*}
As I mentioned last week, it has been rather busy in our household this week and wedding planning has very much taken a backseat. I did however find time to make a start on the bunting which we are using to decorate our marquee at the reception and thought you might like to see how it is turning out, as it is nowhere near finished. Clearly, we need much more than this!
I began by sending an e-mail to all the female family members and friends I could think of that might have hoarded scraps of fabric over the years and so far have received a bag of donations from my Mum, her sister, my Grandmothers, M’s Mum and other female friends. I also dug out my childhood material box and have utilised some of what I found in there too. The nice thing about this is that most of the fabric is offcuts of clothes or things people have made. In photo 3 you can see the remains of my Mum’s nightie that she wore when pregnant with me, a pink and white spotty dress I wore when I was little and the blue sprigged fabric which comprised my ‘wedding outfit’ as a child [a skirt and waistcoat which could be worn over a white blouse - it lasted for years as it could be let out - much more wear than a dress which I would have quickly outgrown]. The floral fabric under the number 6 is left over from a dress my Mum made for summer events, which she wore to my graduation. So a lot of history which I hope might spark some reminiscing at the wedding.
The bunting itself is very easy to make - I made a triangle template (photo 1) and cut out the shapes from the fabric (some of which I had to sew together to create a piece large enough). I then sewed the two triangles together, insides out, and turned them into little triangular bags, which were then turned the right way out (photo 4) and ironed flat (photo 5). I then pinned them to a length of tape - this one is an old piece that Mum found which is why it is so short, the rest will be attached to 20m lengths - and then sewed them onto the tape. My stitching is not very straight but this was the first attempt (and I don’t think anyone will see when it is attached to the marquee). Photo 7 gives some idea of how it looks when it is laid out [please excuse our sofa].
So, white marquee with multi-coloured bunting and miss-matched crockery. Aside from the table decorations (which I will post about soon) these will be our only decorations. I hope it won’t look too sparse, rather English garden party. And the best bit? We can take them home and then we have ready made birthday party decorations for the future…
—
*With the usual apologies for the poor quality snaps from my BlackBerry. I really must get a better camera when I have some money.

DIY Coat Check Tags
As soon as I saw this project on Style Me Pretty last year, I knew I had to make coat check tags. Not only are they easy to do, but they are so unexpectedly cute and I love it when guests know you thought of everything.

{Author’s personal collection}
You will need:
- hole punch
- eyelets & eyelet setter
- rotary trimmer
- cardstock
- elastic
Instructions:
- I started by laying out my template using MS Word (yes, I have Photoshop and Illustrator, but I’m kind of a Word junkie when it comes to tables). I was able to get 9 tags to a page on 8.5×11 paper.
- First, I copied the graphic I wanted into the template (the swirled oval), and created separate cells with a border for the tear-off portion
- Then using Word’s mail merge functionality, I input the numbers into the two spots on the tag
- After printing on my trusty home printer, I cut out each of the tags and using my rotary trimmer, perforated the tear-off portion
- For diagonal corners, I marked off 3/4″ in each direction from both top corners and cut with scissors
- To finish, simply punch a hole and set an eyelet, then thread with elastic!

{Image via Jenna}
Total cost for 100: Elastic = $7, cardstock = $5, eyelets = $10 = $22
Total time: approximately 5 hours (most of this was tying elastic and making the template exactly perfect)
The template for the coat check tags is stored {here}. You’ll need to modify for fonts and such but it might get you started on your way!
E.

Welcome Party, Part 2
Planning this party was SO much fun! I threw as many Braves and baseball details in there as I could. You’ve already seen the centerpieces and seating chart - but we also had Braves wine adorning the bar (Chipper Chardonnay and McCann Merlot, natch), vintage Braves caps as decor, a Smoltz jersey for our “guest book”, and dessert was, of course, ice cream sundaes in mini Braves helmets. Braves highlight reels were playing on the 755 Club screens throughout the evening.
At each guest’s chair was a small gift bag with Braves goodies. I purchased the gift bags, curling ribbon, and tissue from Nashville Wraps and then dressed it up with Braves logos on good old-fashioned Shrinky Dinks.
All credit for the Shrinky Dink inspiration goes to the fabulous Nicole of Making it Lovely. Her detailed Shrinky Dink tutorial is here. I used the clear Shrinky Dink paper, which didn’t exactly come out clear but wasn’t opaque either and it worked perfectly. I would definitely recommend purchasing a convection toaster oven - way easier than the embossing tool.

DIY Welcome Signs
As an extra special welcome, I created these welcome/do not disturb signs to be included in the OOT baskets. The signs went with the slightly French vintage theme of the event - one side “Bienvenue a la Maison” welcomes people into the room and the other “Ne Pas Deranger” asks for a little bit of peace and quiet.

{Image courtesy of Jenna}
Bar none, this was my favorite DIY project. It wasn’t necessarily the easiest and perhaps not the most perfect, but I am so pleased with the results!

{Author’s personal collection}
I have to warn you, these are not for the faint of heart but if you are in the mood to DIY them, I’ll give you all of the instructions here.

DIY Folding Chair Covers
One of the quirks of the barn is the man who oversees its rental. It’s owned by a larger group, but this guy has all the say, at least as far as I know. He’s made a couple of ridiculous rules (which seem to not always be enforced). The barn is rented with tables and chairs in it. The tables are rustic looking aged wood, while the chairs are metal and folding.

(Source: KristenHenschen on Flickr)
At first I thought that was no problem, we’d just rent different chairs. I mean, heck. Anything is better than a metal folding chair! But it turns out that they don’t allow that at all. You use the metal folding chairs… “Or nothing” isn’t even an option – we aren’t allowed to store them out of sight.

Gocco Cocktail Napkins
So many of these adorable napkins have been floating around that I’m itching to try this!
Whitney is so talented with her DIY projects. Sigh.

Altered Votives
Came across these little DIY beauties via the EcoArt Weddings blog.
Aren’t they lovely? Modpodge, glitter, and a recycled jewelry finding. Genius!
E.


